 Coming. Going. Streaming. Flowing.
Step by Step: How to Get Hamlib Working in Windows
"If this is too long for you to read, then maybe you don't need to know."
Teaching Men to Fish
I'm new to HF. And HF is new. HF is being reinvented every day. For better or worse, the dominance of CW and phone as primary modes of operation is a thing of the past. While the digital modes will never completely replace CW and phone, their popularity is growing and that growth shows no evidence of stopping. So naturally while learning the intracacies of HF, I have focused a lot of energy on trying to understand the myriad types of digital modes. That means working with myriad pieces of software.
I wanted a logger of some sort to be the central database of my HF journey. Then I needed apps to allow me to use different modes. Over weeks I narrowed things down to a few candidates, and, after many install/uninstall iterations, settled on my main four.
They are: (in no particular order)
Fldigi - a multi-mode software modem capable of transcoding over fifteen digital modes. WSJT-X - the package widely known for the FT8 weak-signal protocol that has exploded in popularity. JS8Call - software using the JS8 protocol to provide weak-signal terminal to terminal messaging. Log4OM2 - a modern, very capable logging package.
Each of these packages operates as a stand-alone, but they all have a couple of things in common:
- They talk to the radio, both to display data from it, and to control it.
- They all log QSO's and can be configured to consolidate that info in Log4OM2.
The hard part is creating a system that allows for the seamless switching between packages. I wanted to be able to boot the computer and just go to work. No fiddling, fussing or dinking around. I wanted to shift from one software package to another without having to make any changes in my main logging package at all. That's what I finally accomplished, and what I want to share here. It was easy once I knew how. Finding out how was the hard part.
Here's What We're Going to Cover:
The Index Getting Hamlib Running in Windows - automating the process. Install and Find Hamlib - first step. Add Hamlib to your path - makes life so much easier. Create a batch file - we need to do a couple of things in a row. So 'batch' file. Schedule in Windows - use Windows scheduler to run our .bat on login. The TCPview utility - Microsoft provides a nice utility to watch these thing work. Fldigi Settings - basic functions. More to learn. WSJT-X Settings - works flawlessly. JS8Call Settings - almost flawless. Log4OM2 Settings - truely awesome.
I did it! It is now a Thing That Works! Let's get on with the explanations.
Hamlib is the Glue
Getting software to talk to a radio and control it is called "rig control". There are a few options for doing this. There is Hamlib, Ham Radio Deluxe Rig Control, Flrig, RigCAT, OmniRig, and possibly others. The good news is they all work. The bad news is they are incompatible, and in some cases competitors.
Hamlib was my best choice because all of my chosen apps listed it as a rig control option. I like that it's open sourced, and a Linux-ey solution because I understand Linux. Fortunately it's also ported to Windows, because nearly all the software I want to use runs on Windows.
Hamlib (Ham Radio Library) is a command-line utility. It was initially designed to be used that way. A bit later someone created a daemon version that runs quietly and continuously in the background (that's what daemons do). Unless you are accustomed to reading the documentation for things like this, you might have a hard time figuring out the difference between the two, or how to actually use them.
PART 1: Install Hamlib
Get Hamlib. I like Github, so I got my copy here. Install it using whatever method is appropriate to your particular idiom.
PART 2: Use Hamlib
You will need to use a Windows shell to use Hamlib. This is only the first of many places you may find yourself scratching your head. It's OK. There's a first time for everything. Hit the Windows key on your keyboard and start typing PowerShell.
Alternatively you can right-click the Windows logo and select Windows PowerShell there.
Another note: I followed the advice you will see at the top of the original Windows PowerShell dialog
and installed the newer version of PowerShell.  It is my preferred Windows shell these days.
Not necessary, just nice and fyi.
OK. You have the Windows shell open, now you need to go to the directory where hamlib is installed. You DO know where Hamlib is installed, right? You don't? Ah. Well don't feel bad. Microsoft intentionally hides things like that from you. They think you're too dumb to be trusted with all that knowledge.
Click on File Manager (little folder icon), navigate to your C:\ drive, then type hamlib in the search box.
Do not stop the search!
Go get a cup of coffee. When you get back it might be finished.
Now you get to choose which one to click on. Hmmm . . .

(hint: the one that says C:\Program Files)

I think it's crazy that after all of that, they still don't tell you exactly where your file is. Take a look. Do you see anything that looks like this?
C:\Program Files\hamlib-w64-4.5.5\
No, you don't. But that is the bit of information you need to accomplish what we are trying to do here.
If Hamlib had an entry in the Windows Start menu, you could just right-click on its icon and select "Open File Location". But utilities like Hamlib aren't intended to run on your desktop, so they don't have a entry in the Windows Start menu. Oh well.
Now here's another fun factoid that you may have missed. You don't use hamlib by typing hamlib. You type rigctl. Yes, that's right: rigctl. Hamlib is a library. You don't read the library, you read a book. The library has lots of books. Hamlib has lots of tools. The one we want is rigctl. We learned that by reading the docs and googling. You determined where hamlib is installed. You need to go there.
In the open terminal window, type cd c:\prog and press tab. You should see 'C:\Program Files'. Now type ham and press tab. Now you should see something like 'C:\Program Files\hamlib-w64-4.5.5\'.
You thought we were done, but no. The tools that this library has are contained in the bin sub-folder of the Hamlib folder. "Bin" is short for binary. A 'binary' is an executable file. If you cd into the bin subdirectory (folder) and type dir you will see the list of tools Hamlib has to offer.
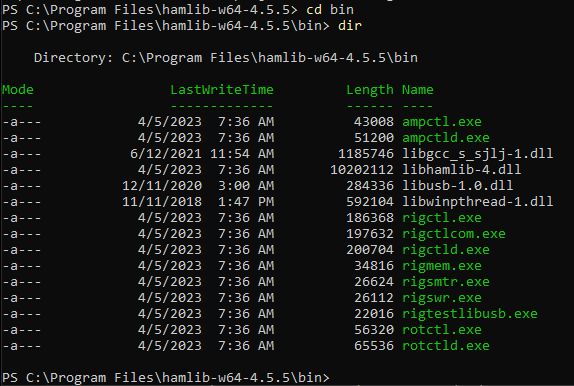
If you do, that means you're in the right place. If not, you have to find it.
If you are in the right place, when you type rigctl -help and press enter you will see this and a whole lot more. You'll need to scroll back up to find the top again.

At this point you know you have found the installation folder for hamlib.
Now you're ready to add hamlib\bin to your path. Index
Hit the Windows key on your keyboard and type path.
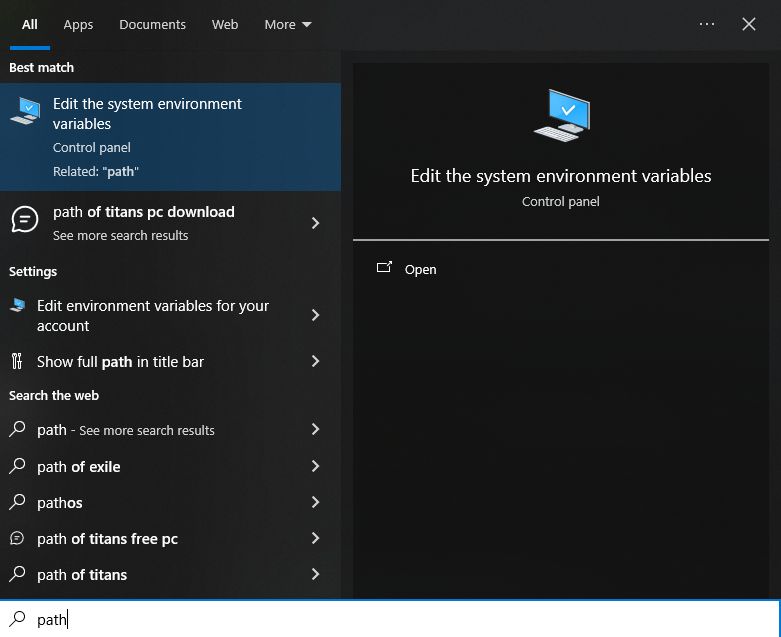 Yeah, that's the one.
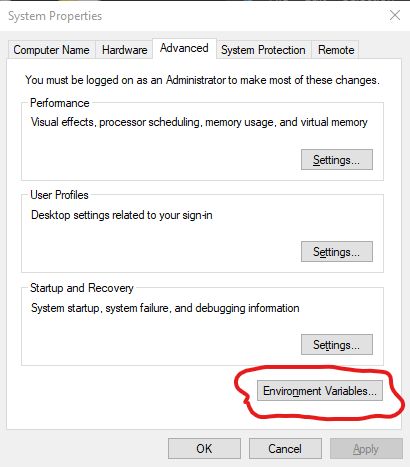
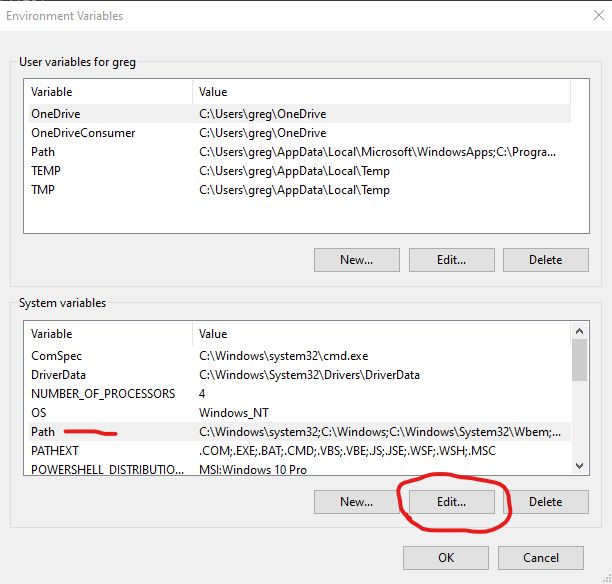
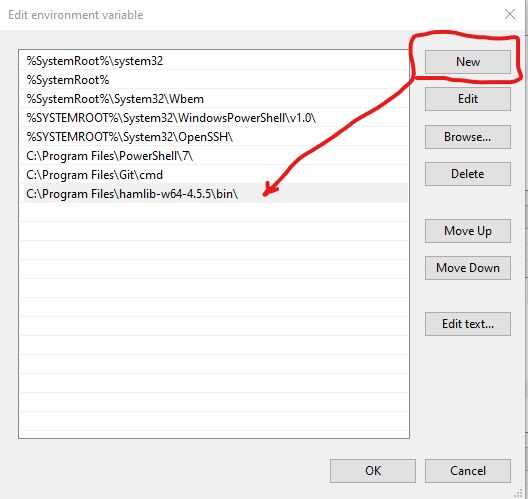
Look at the next two screenshots. In the System variables section, select Path, then hit Edit.
Hit New, then put your Hamlib install path in the new blank box and hit OK.
If you close your Powershell terminal and reopen it, you should be able to type rigctl -help and get the proper response. If that doesn't work, log out and back in and try again. If that still doesn't work, you did something wrong somewhere. The purpose of adding the Hamlib\bin folder to the system path is so the system can find the executable binary files in that folder no matter what folder you are in when you type one of the Hamlib tool commands.
NEXT: We will need to create a batch file. Index
This is one of those points where the experience you accumulate may turn out differently than mine. This happens because of the march of time and the nature of software development. Things change.
As of this writing, I learned that simply starting the rigctl daemon was not enough to make everything work. I also had to 'initialize' it by passing a command. Only then would the other packages see the radio using hamlib.
So I created a batch file to run three commands in a row.
cd "C:\Program Files\hamlib-w64-4.5.5\bin\"
START /MIN rigctld --model=1035 --rig-file=COM4 --serial-speed=38400
rigctl -m 2 f
You might be wondering if I'm going to explain all that text. Well, fine. OK.
First we change to the hamlib\bin directory (folder).
Then we issue a command that starts a new shell minimized and starts rigctld with a set of parameters.
--model= tells rigctld what radio model I'm using.
--rig-file= is actually the comm port the radio is on.
--serial-speed= is the speed that comm port is set to.
The rigctld daemon then 'stands in' for your radio, channeling data to and from the radio for any app that asks for it. This is desirable because only one device at a time can be connected to a comm port. So the daemon process connects to the comm port, and listens on a TCP/IP port for requests. It creates as many outgoing TCP/IP ports as needed and basically multiplexes the single comm port out to multiple applications on the local computer or even others on the network, if so configured.
The last line issues a command to the rigctl daemon (-m 2 which is the same as --model=2 and 2 is the number for the daemon). In order to initialize the connection I simply ask it for the frequency (f). From that point on hamlib (rigctld) knows who it is talking to.
You really must read the hamlib documentation for yourself, or at least scan through it enough to figure out what settings your setup requires.
Also note this: hamlib was written for Linux. We're lucky to even have it at all in the Windows world. So things like --rig-file may seem odd, but they are not really. In Linux, everything is a file.
What is called COM1 in Windows is a file named /dev/ttyS0 in Linux. The daemon thing is also a Unix/Linux concept. Windows has an analog, it's just not normally referred to as a 'daemon'.
You create batch files like this one with a text editor, not a word processor. Notepad is the basic text editor that ships with Windows. I like Notepad++ which is quite full-featured, but still just a text editor.
The difference between word processors and text editors in this context
is the way they write the file to disk.  Word processors insert a bunch
of formatting codes.  Text editors stick pretty much to plain ASCII which
is the basic building block of human-readable computer files.
You get to choose what you name your batch file, however, it must end with .bat . Save your batch file in a place that makes sense to you. I created a folder named 'scripts' in my Documents folder for things like this.
Once your batch file is saved, then we are ready to set it to start when we log in to Windows. To do that, we use Task Scheduler, which ships with Windows.
NEXT: Using Task Scheduler to set our batch file to run on login. Index
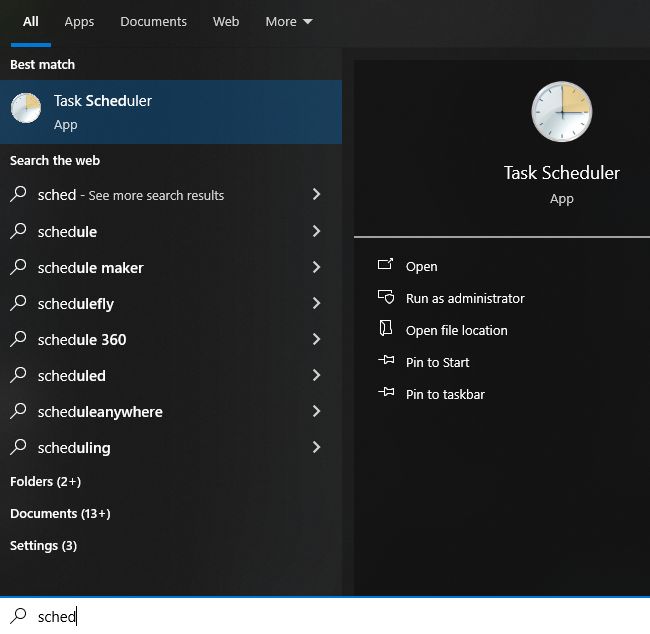
Hit the Win key on your keyboard and type sched. You should see the Task Scheduler among the choices presented.
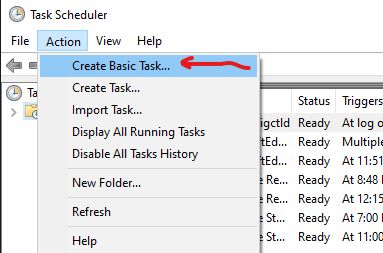
Use the Create Basic Task wizard to step you through the process of setting a schedule to run your batch file when you log in. Be sure you use the full path to your batch file. Select the trigger related to logging in. Leave everything else pretty much as it is. If you need more info, I suggest googling a video or two. There are lots to choose from.
Reboot your computer just to be sure everything is doing what you expect. Now test.
BTW: Want to be able to see this stuff working? Index
There is a free app published by Microsoft called TCPview which I have found to be very valuable. You can get it here:
https://learn.microsoft.com/en-us/sysinternals/downloads/tcpview
I start TCPview and type 'rig' in the search box. When the batch file runs, I see rigctld pop up. When one of the client apps connects, I see that also. Very nice.
Fldigi: Settings related to Hamlib. Index
The Fldigi settings. The circles are (you guessed it!) critical items that you need to ensure are as you see them here.
There are still a million or so things about Fldigi that I have to learn. What I know is the basic functions of displaying and controlling the radio seem to be working just fine. So, for now, I'm happy.

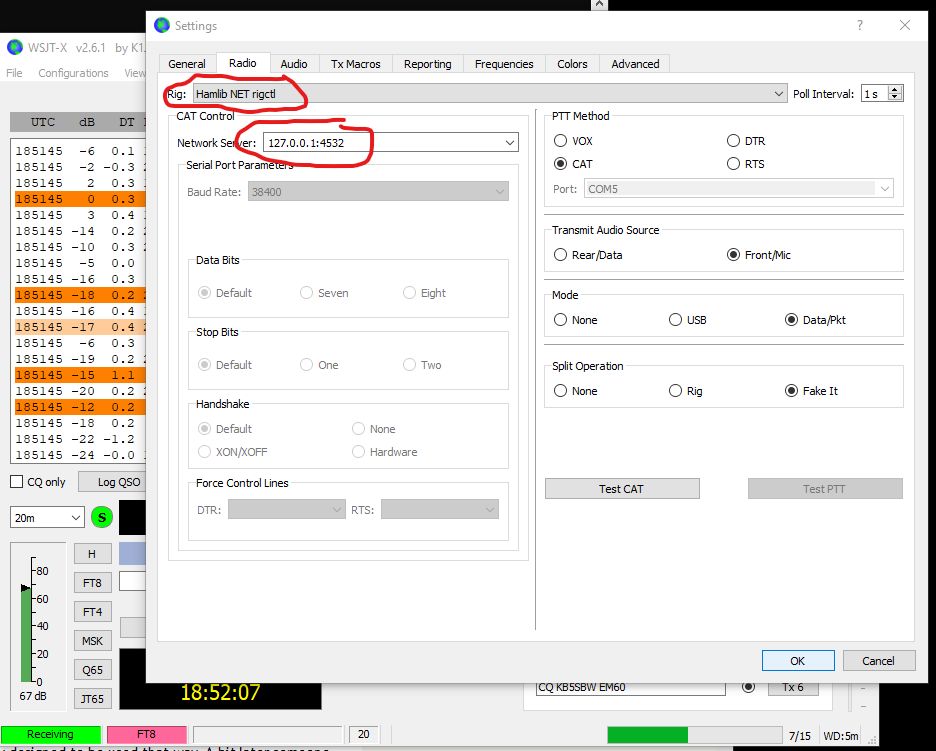
WSJT-X: Settings related to Hamlib. Index
The WSJT-X settings. The circles are (you guessed it!) critical items that you need to ensure are as you see them here.
WSJT-X works flawlessly with Log4OM2. When I double-click on a call, the call gets sent to the open log entry window in Log4OM2, which in turn does the lookups and fills in all the fun stuff. Log4OM2 also updates the maps to show me where my contact is on the globe. Very nice. When I save the log entry in WSJT-X, Log4OM2 saves its entry. Seamless.
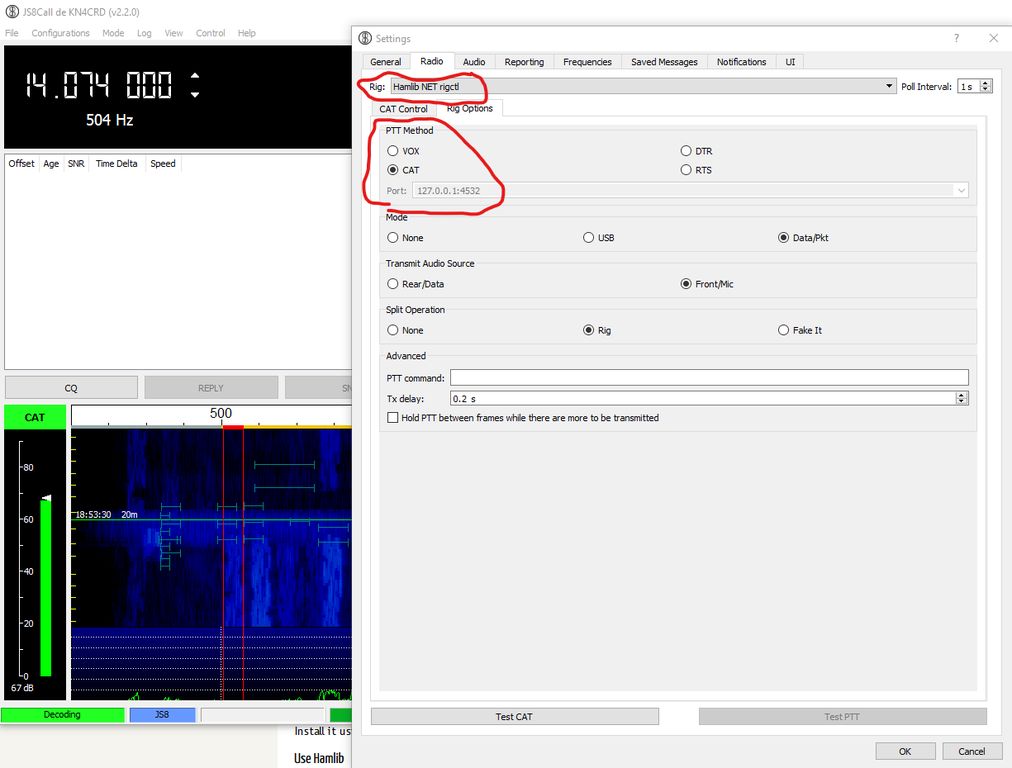
JS8Call: Settings related to Hamlib. Index
The JS8Call settings. The circles are (you guessed it!) critical items that you need to ensure are as you see them here.
JS8Call almost works flawlessly, but not quite. I have been unable to get the Log4OM2 open log entry populated from JS8Call. That means I only see the contact details after I save the JS8Call log, so I miss out on the map and details during the QSO. That's disappointing.
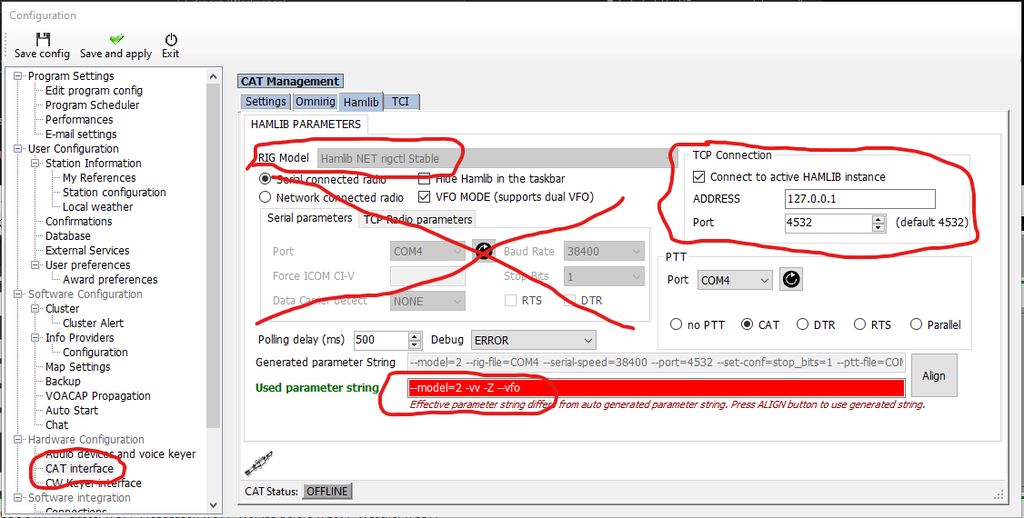
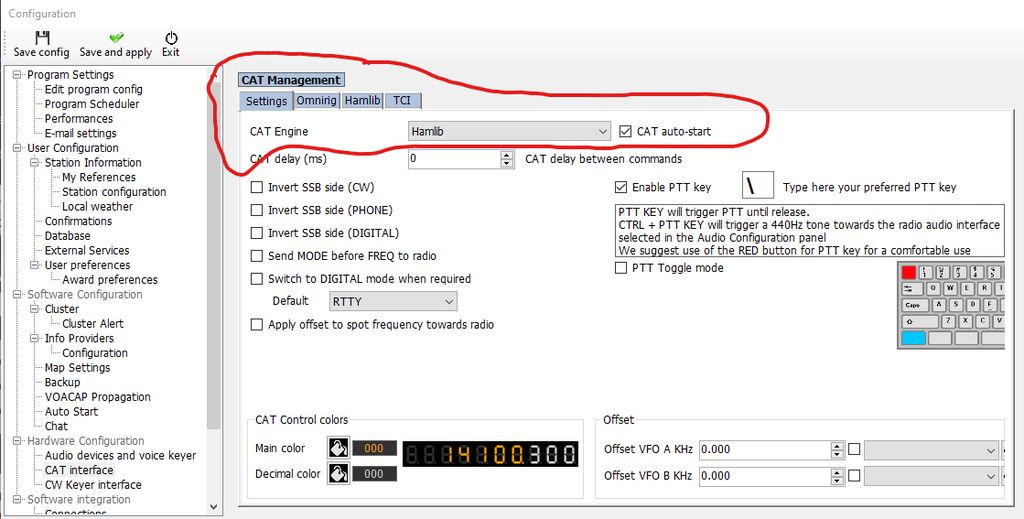
Log4OM2: Settings related to Hamlib. Index
The Log4OM2 settings. The circles are (you guessed it!) critical items that you need to ensure are as you see them here. I bet you're seeing a pattern here. This time there is an X, and it means don't worry about these, they are irrelevant.
And that, my friend, is that.
Those are the things I did to get my system working the way I think it should.
I fire up the power supply, turn on the radio, boot up the computer, log in to Windows, start up Log4OM2 and then go about whatever it is I'm intending to do.
Oh, and by the way, remember what I said about only one device at a time being able to connect to a comm port? This is what happens when you try to use a non-hamlib application while the rigctld daemon is running.
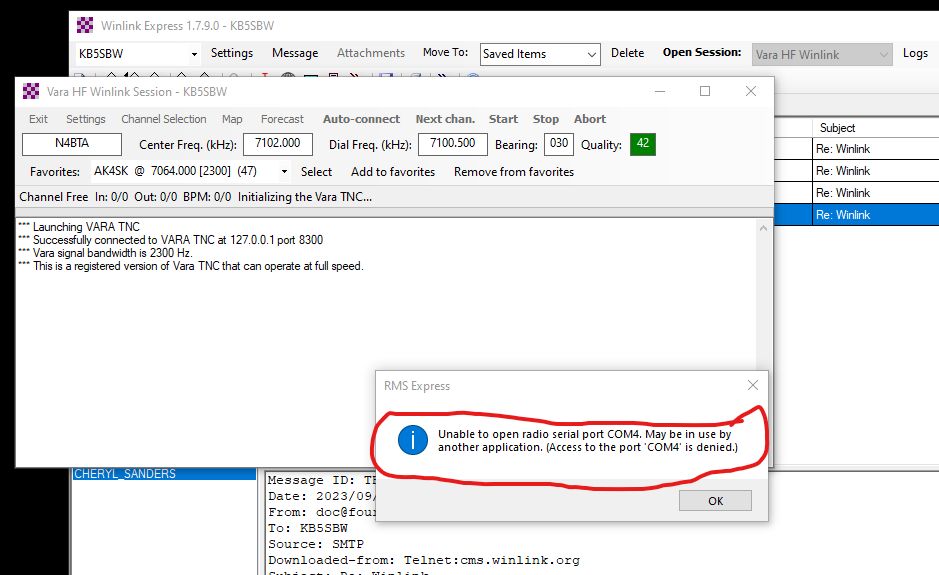
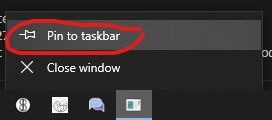
This is why I notice what icon is related to my batch file, and I pin it to the taskbar. That way I can tell Windows to shut it down quickly and easily, and also restart it just as easily.
Finally, after weeks of angst, my digital HF setup is a Thing That Works!.
